Technical Support
Please email or call us on +61 419 909 340 for any enquiries.Terms and conditions apply.
- I receive 'The version of this file is not compatible with the version of Windows you're running' when trying to install DFT on a 64-bit machine
- DFT crashes on close
- I receive 'Error 380 - Invalid Property Value' when starting DFT
- How do I install Duty and Flight Times on my computer?
- How do I install DFT and transfer my data for use on my personal laptop or computer?
- How do I upgrade Duty and Flight Times on my computer?
- How do install Duty and Flight Times together with the DFT upgrade I received?
- When I install Duty and Flight Times, the following error occurs: "The requested operation requires elevation"
- How do I register Duty and Flight Times?
- DFT is asking for a registration code after installing on a new computer
- How do I setup a local computer to use the DFT data located on the server / another computer?
- How do I backup all pilot data onto a CD/USB stick?
- How do I restore all pilot data from a CD/USB stick?
- How do I setup DFT to automatically backup to the server, another computer or a USB stick?
- I have transferred to another company - how do I take my data with me?
- How do I transfer my data onto another computer using a USB stick?
- How do I transfer my data onto another computer via email?
- How do I transfer my data onto my laptop?
- Why do I receive a 'Pilot not found' message when opening a DFT email attachment?
- My computer has been cleaned of a virus or spyware and now DFT is asking for a registration code
- How do I change where the DFT package importer the files to?
- The registration code that I received does not work?
- Why are the dates shown in American format?
- I am running Windows 7 and all dates are in the correct format (Australian) except for the work date which is in American format?
- I get an error 'Report width is larger than the paper width' when printing a report?
- How do I export my data?
- When I send an email I receive error: Apply for IPv6 Policy?
- I get an error when using GMAIL and sending a DFT email
- Can I install and run DFT on a Macintosh computer?
- How do I obtain the company name and serial number of my DFT installation?
- Why does the Automatic Backup facility report - NOTHING TO DO!
- When I run DFT I get a runtime error 429 - what is wrong?
- How do I setup DFT to always open a particular pilot?
- How does the DFT licencing work?
- When I import an emailed package I receive an error "429, "ActiveX Can't Create Object".?
- How do I delete a pilot?
- I receive an error Access Denied when running Airstrips for the first time
- An "Invalid pilot name or password" error occurs when synchronising
- I have followed the FAQ suggestions and am still having difficulties - do you offer technical support?
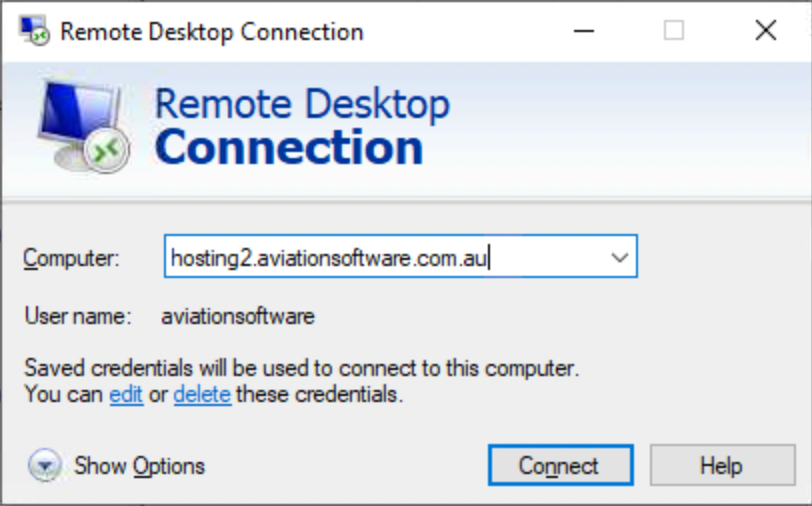
Connect to DFT online from Windows 10/11
To connect from Windows 10/11:
- Make sure that you are connected to the Internet.
- Click the Start button then type "remote" and select Remote Desktop Connection
- Click Show Options if it is visible at the bottom of the window (otherwise it will say Hide Options
- Enter hosting2.aviationsoftware.com.au (or hosting.aviationsoftware.com.au if you are a customer before Nov 2024) as the computer to connect to.
- Go to Local Resources tab, and ensure Printers is checked in the Local Devices and Resources box. This allows printing reports to your local printer.
- Click Connect
- Type the user name provided by Aviation Software
- Tick Remember my credentials.
- This will log you into the server and automatically startup the DFT application.
- To return to your desktop, select Start > Windows Security > Logoff.
- To connect in future, start mstsc and the connection will be in your recent list.
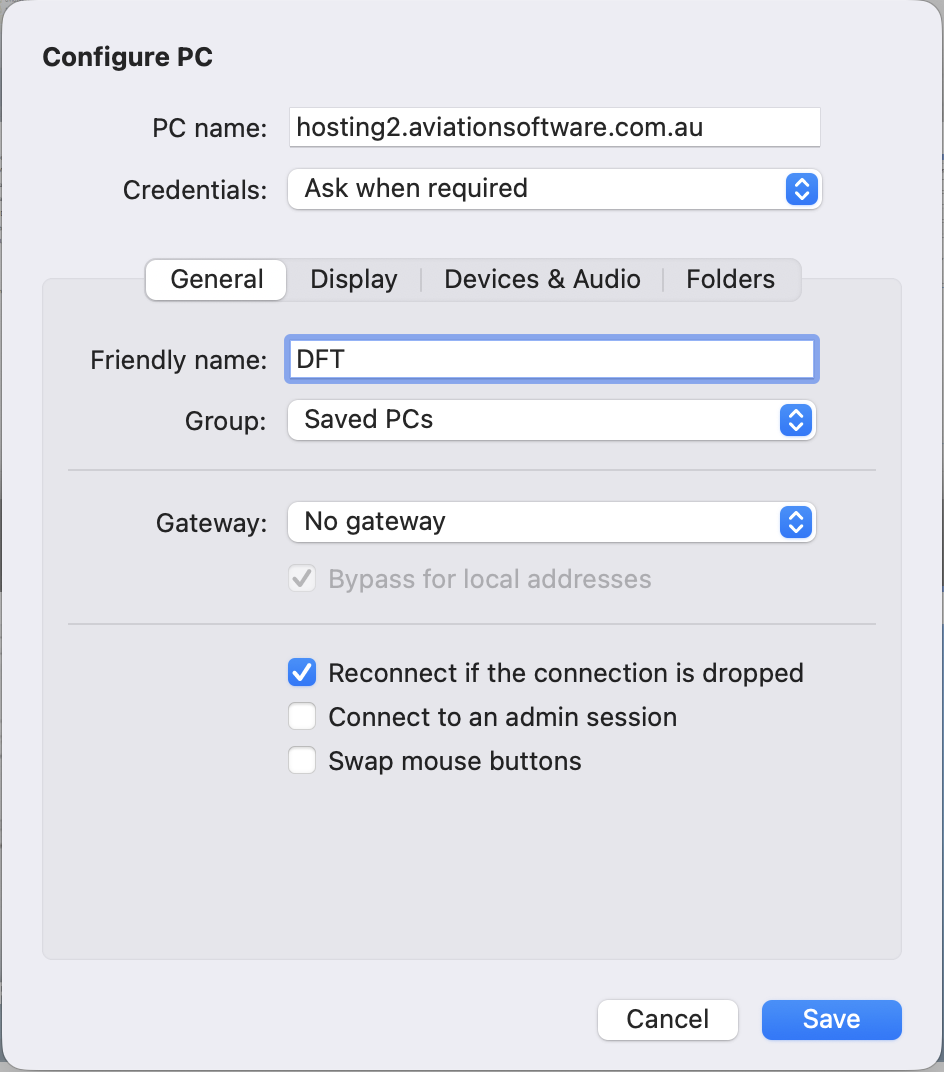
Connect to DFT online from a Mac
To connect from a Macintosh:
- Ensure that you are connected to the Internet.
- Ensure Microsoft Remote Desktop is installed.
- Start Microsoft Remote Desktop.
- Select Connections > Add PC.
- Set PC name to hosting2.aviationsoftware.com.au (or hosting.aviationsoftware.com.au if you are a customer before Nov 2024).
- Set User account to Add a User Account
- Set User name to the user name as provided by Aviation Software.
- Set Password to the password as provided by Aviation Software.
- Click Add.
- Set Friendly name to DFT (or something else you would prefer).
- Select Devices & Audio tab and check Printers. This allows printing reports to your local printer. Also ensure that your default printer is setup as A4 so that your reports print:
- > System Settings > Printers & Scanners > Default Printer
- Default paper size > A4
- Click Add.
- Double click the DFT connection.
- This will log you into the server and automatically startup the DFT application.
- To return to your desktop, select Start > Windows Security > Logoff.
- To connect in future, start Microsoft Remote Desktop and double click on the DFT Online connection.
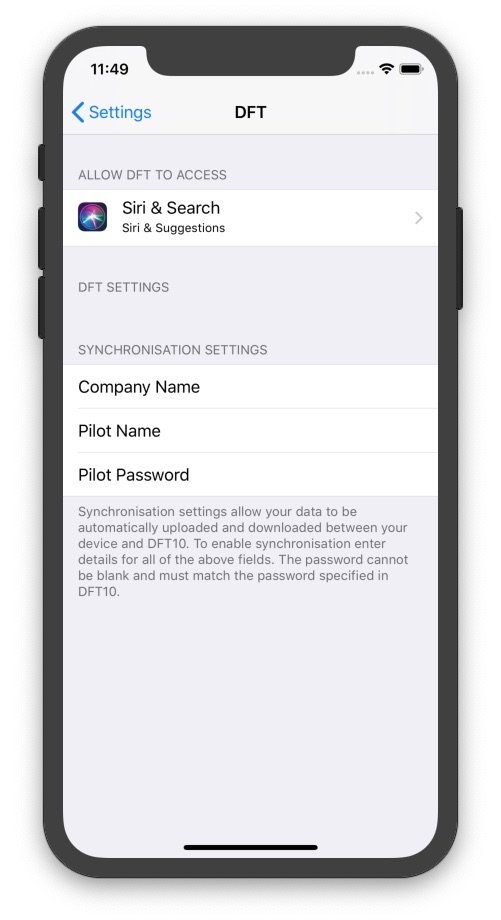
Connect to DFT online from a iOS
If you have not already, run through Connect from (Windows X or Mac OS) below and setup the password for the pilot you are going to setup.
To enter your duty and flight hours via your iPhone or iPad:
- Download the app from the App Store.
- Go to Home > Settings > DFT, and set:
- Set Company Name to Your company name
- Set Pilot Name to <Your name in DFT>
- Set Pilot Password to <Your DFT password>
Connect to DFT online from Windows 8
To connect from Windows 8:
- Make sure that you are connected to the Internet.
- Swipe in from the right edge of the screen, tapping Search, or if you're using a mouse, point to the upper-right corner of the screen, moving the mouse pointer down, and then clicking Search.
- Enter mstsc in the search box, tapping or clicking Apps, and then tapping or clicking mstsc.
- Enter hosting2.aviationsoftware.com.au (or hosting.aviationsoftware.com.au if you are a customer before Nov 2024) as the remote PC to connect to.
- Go to Local Resources tab, and ensure Printers is checked in the Local Devices and Resources box. This allows printing reports to your local printer.
- Click Connect
- Type the user name provided by Aviation Software
- Tick Remember my credentials.
- This will log you into the server and automatically startup the DFT application.
- To return to your desktop, select Start > Windows Security > Logoff.
- To connect in future, start mstsc and the connection will be in your recent list.
Connect to DFT online from Windows 7 / Vista
To connect from Windows 7 / Vista:
- Make sure that you are connected to the Internet.
- Click Start, point to All Programs, point to Accessories and then click Remote Desktop Connection.
- Click Options.
- In the Computer list, type hosting2.aviationsoftware.com.au (or hosting.aviationsoftware.com.au if you are a customer before Nov 2024).
- Type the user name provided by Aviation Software
- Tick Allow me to save credentials. If only the Always ask for credentials check box is displayed then:
- Select delete from the "You can edit or delete these credentials".
- Tick Allow me to save credentials.
- Go to Local Resources tab, and ensure Printers is checked in the Local Devices and Resources box. This allows printing reports to your local printer.
- Click Save As
- Save to the Desktop and call it DFT Online -- this will create a desktop shortcut you can use to connect again in future.
- Click Connect
- In the Log On to Windows dialog box that appears, type the password provided by Aviation Software into the Password box, tick Remember my Credentials and then click OK.
- This will log you into the server and automatically startup the DFT application.
- To return to your desktop, select Start > Windows Security > Logoff.
- To connect in future, just double click on the DFT Online shortcut on the desktop created in step 9.
Connect to DFT online from Windows XP
To connect from Windows XP:
- Make sure that you are connected to the Internet.
- Click Start, point to All Programs, point to Accessories and then click Remote Desktop Connection.
- Click Options.
- In the Computer list, type hosting2.aviationsoftware.com.au (or hosting.aviationsoftware.com.au if you are a customer before Nov 2024).
- Type the user name provided by Aviation Software
- Type the user name provided by Aviation Software
- Tick Allow me to save credentials. If only theAlways ask for credentials check box is displayed then:
- Select delete from the "You can edit or delete these credentials".
- Tick Allow me to save credentials.
- Click the Local Resources tab > click Printers in the Local Devices box. This allows printing reports to your local printer.
- Click Save As
- Save to the Desktop and call it DFT Online -- this will create a desktop shortcut you can use to connect again in future.
- Click Connect
- In the Log On to Windows dialog box that appears, type the password provided by Aviation Software into the Password box, tick Remember my password and then click OK.
- This will log you into the server and automatically startup the DFT application.
- To return to your desktop, select Start > Windows Security > Logoff.
- To connect in future, just double click on the DFT Online shortcut on the desktop created in step 9.
Connect to DFT online from iPad
To connect from an iPad:
- Make sure that you are connected to the Internet.
- Ensure Microsoft Remote Deskop
 is installed (or another RDP client)
 - Start RD Client
- Tap + to create a new connection
- Tap Add PC
- Tap PC Name and enter hosting2.aviationsoftware.com.au (or hosting.aviationsoftware.com.au if you are a customer before Nov 2024)
- Tap User Account > Add User Account
- Tap User Name and set to the user name as provided by Aviation Software.
- Tap Password and set to the password provided by Aviation Software
- Tap Save > Back
- Optionally, tap Friendly Name and enter DFT
- Tap Save You have completed the setup for Remote Desktop.
- Suggestion: Tap DFT Online at the top of the screen, and then tap the pencil icon at the top left, to display the mouse cursor on screen.
- To return to Microsoft Remove Desktop, select (from the bottom left-hand corner) Start > Windows Security > Logoff.
- To connect in future, just select DFT to automatically connect.
I receive 'The version of this file is not compatible with the version of Windows you're running' when trying to install DFT on a 64-bit machine
To install Duty & Flight Times on a 64-bit machine:
- Select Start > Windows Explorer
- Navigate to the DFT CD or installation directory
- Right-click on the Setup[.exe] program and select Properties
- Go to Compatibility, select Run this program in compatbility mode for Windows XP (Service Pack 3)
- Select OK
- Double click Setup[.exe] and now DFT can be installed
DFT crashes on close
I receive 'Error 380 - Invalid Property Value' when starting DFT
The cause of this issue is related to security update Security Update for Windows (KB3006226). Upgrading DFT to version 10.1.4+ or uninstalling this update corrects the issue. Below are steps to uninstall the update and flag it to not be installed in future. This allows future windows updates to be installed while ensuring DFT runs correctly. If you have already rolled back to a previous restore point, then see section below entitled
I have already rolled back to a previous restore point.
- Click Start and in the search box, type Programs and Features and then select View installed updates.
- Find the update Security Update for Microsoft Windows (KB3006226) under the Microsoft Windows group.
- Right click on the update and select Uninstall.
- Select Restart Now
- After rebooting the computer, click Start and in the search box, type Update and then in the list of results click Windows Update.
- Click Check for updates and then wait while Windows looks for the latest updates for your computer.
- Click the 1 important update is available link.
- Right click on Security Update for Microsoft Windows (KB3006226) and select Hide update.
- Select OK at the bottom of the screen.
- You can now continue receiving future windows updates and using DFT.
I have already rolled back to a previous restore point:
- Click Start and in the search box, type Update and then in the list of results click Windows Update.
- Click Check for updates and then wait while Windows looks for the latest updates for your computer.
- Click the nn important updates are available link.
- Right click on Security Update for Microsoft Windows (KB3006226) and select Hide update.
- Select OK, and then Install updates.
- You can now continue receiving future windows updates and using DFT.
How do I install Duty and Flight Times on my computer?
To install Duty & Flight Times - please follow the steps below:
- Insert the Duty & Flight Times installation CD
- This will begin the Duty & Flight Times installation. If the Duty & Flight Times installation does not begin:
- Start Windows Explorer (Select Start > Run > Enter explorer.exe > Select OK)
- Expand My Computer
- Find the CD drive - it should be labelled Duty & Flight Times
- Click on the CD drive
- Double click the Setup program to begin the installation process
- Follow the prompts and install the default location and when prompted overwrite any existing files.
- Repeat the above steps for each computer from which you wish to runDuty & Flight Times. Even if you are intending to run Duty & Flight Times from a server - you must install Duty & Flight Times on each computer locally.
How do I install DFT and transfer my data for use on my personal laptop or computer?
DFT licencing allows your personal data located on a main server to also be accessed and copied onto a personal laptop or computer without requiring a registration code. The personal computer must only be used for your pilot data (not other pilot's data). To setup your computer or laptop for personal use:
- Create yourself as a new pilot at the main base (not on your personal laptop or computer), if you have not already done so. Please click here to purchase additional pilot licences.
- Install DFT on your personal laptop or computer.
- Transfer your pilot data from the main base to your personal laptop or computer.
- DFT will now run in restricted mode which provides full DFT functionality for your personal data. If other pilots are imported onto your personal laptop or computer then DFT will no longer run in restricted mode and you will be prompted for a registration code. If this occurs, delete the imported pilot/s from the Pilot Summary screen.
How do I upgrade Duty and Flight Times on my computer?
If you have received an Duty & Flight Times upgrade via a CD then refer to How do I install Duty and Flight Times on my computer? If you have received a Duty and Flight Times upgrade via email, then proceed with the following steps:
- Open the email that contains the Duty & Flight Times upgrade from Aviation Software
- The email will contain a link to the upgrade. Find the link and click on it. The link will typically be something like: http://www.aviationsoftware.com.au/updates/DFT_8_UPDATE_XXX.zip
- When promted with: Do you want to open or save this file? selectSave
- Select Desktop in the Save In: list
- Select the Save button
- Run Windows Explorer (Select Start > Run > Enter explorer.exe > Select OK)
- Select Desktop on the folders pane on the left hand side. (You may need to select View > Explorer Bar > Folders if the left hand side pane is not shown).
- Double click on the DFT_8_UPDATE_XXX.Zip file you downloaded
- Double click on the Setup program, the WinZip Self-Extractor will appear
- If you have installed DFT to a folder other than the standard folder C:\Program Files\Dft6 then change the Unzip to Folder directory
- Select Unzip
- This will install and copy the necessary files and install the update. The above process must be performed for each computer that will run Duty & Flight Times - even if you are running DFT using a server.
If you have received an update via email - it is important that you make a backup of the update onto a CD so that if Duty & Flight Times is re-installed in future you can easily install the update. Aviation Software will not provide free updates if you have not burnt the update to CD. You will be required to purchase a complete upgrade. To save your email upgrade to CD:
- Insert a blank CD into your CD drive.
- Run Windows Explorer (Select Start > Run > Enter explorer.exe > Select OK)
- Select Desktop on the left hand side. (You may need to select View > Explorer Bar > Folders if the left hand side pane is not shown).
- Select the DFT_8_UPDATE_XXX.Zip file you downloaded from the steps detailed in How do I upgrade Duty and Flight Times on my computer?
- Select Edit > Copy from the menu
- Expand My Computer on the left hand side pane
- Find the CD drive in the folders list on the left hand side. (You may need to select View > Explorer Bar > Folders if the left hand side pane is not shown).
- Select the CD drive
- Select Edit > Paste from the menu bar at the top of Windows Explorer to copy the DFT_8_UPDATE_XXX.Zip file to the CD
- Eject the CD and Windows will write the contents of the update to the CD
- Write the version number and place the CD with the original CD purchased from DFT. If in future you wish to install DFT on another computer you will need to install DFT from the CD and then install the update. For further information please refer to How do install Duty and Flight Times together with the DFT upgrade I received?
How do install Duty and Flight Times together with the DFT upgrade I received?
If you have received a Duty & Flight Times CD and then subsequently received an email upgrade then you must perform the steps detailed in Saving your backup to CD in How do I upgrade Duty and Flight Times on my computer? To install Duty & Flight Times:
- Install the original Duty & Flight Times CD you received: How do I install Duty and Flight Times on my computer?
- Install the CD upgrade you received via email:
- Insert the CD that contains the backup you created as detailed in Saving your backup to CD
- Run Windows Explorer (Select Start > Run > Enter explorer.exe > Select OK)
- Expand My Computer. (You may need to select View > Explorer Bar > Folders if the left hand side pane is not shown).
- Select the CD drive on the left hand side.
- Double click on the DFT_8_UPDATE_XXX.Zip file you downloaded
- Double click on the Setup program, the WinZip Self-Extractor will appear
- If you have installed DFT to a folder other than the standard folder C:\Program Files\Dft6 then change the Unzip to Folder directory
- Select Unzip
The above process must be performed for each computer that will run Duty & Flight Times- even if you are running Duty & Flight Times using a server.
When I install Duty and Flight Times, the following error occurs: "The requested operation requires elevation"
This error indicates that the application must be installed in Administrative mode. To do so:
- Navigate to the Setup.exe application installation
- Right-click the Setup.exe and select Run as Administrator
- Follow the remaining prompts as per the normal installation process
How do I register Duty and Flight Times?
If you have recently received your Duty & Flight Times CD then you will need to enter the registration code that is enclosed with the Duty & Flight Times letter. Specifically:
- Start DFT
- Enter the registration code that is enclosed with the Duty & Flight Times letter
- Select Register
- If DFT is setup to utilise the data located on a server then the registration code does NOT need to be entered for each machine running Duty & Flight Times. It only be needs to be entered once.
You must install Duty & Flight Times within 14 days of ordering, otherwise the registration code will expire. If you do not register the program within this period of time, then please contact Aviation Software for a new registration code. Aviation Software may charge an additional fee for supplying a new registration code.
DFT is asking for a registration code after installing on a new computer
If you have recently received (within 14 days) your Duty & Flight Times CD and installation please refer to How do I register DFT? If you already have DFT successfully installed on another computer, then you will need to setup the new computer to utilise the data on the other machine. Once the new installation has been setup correctly the program will not prompt for the registration code. If the two computers are on the same network then please refer to How do I setup a local computer to use the DFT data located on the server / another computer? for further details. If the new installation is for a laptop computer that will not be on the same then please follow the steps - How do I transfer my data onto my laptop?
How do I setup a local computer to use the DFT data located on the server / another computer?
Firstly, you will need to setup the server / other computer so that other computers on the network can access the files:
- Logon to the server / other machine where Duty & Flight Times is installed or the data is already stored. (Duty & Flight Times does not need to be installed on the server). Login using the Administrator user name and password - you may need help from your IT department.
- Run Windows Explorer (Select Start > Run > Enter explorer.exe > Select OK)
- Select My Computer
- Select Local Disk C:
- Select Program Files
- Right click the Dft6 folder (it may also be calledDft8) and select Properties
- Select the Sharing tab
- Tick Share this folder on the network
- Tick Allow network users to change my files
- Select OK
- Select Start > Control Panel > System
- Select the Computer Name tab
- Note down the name of the server / other computer next to the Full computer name field
On the computer with the new Duty & Flight Times installation:
- If you have not already done so, install DFT on the new machine using the installation CD
- After installation, navigate to the desktop
- Right click the DFT shortcut and select Properties
- In the Target box (typically containing something like "C:\Program Files\DFT6\dft8.exe" you will need to specify the path to where the DFT data is located - in this case the computer name as noted in step 13 above.
- The path to the other computer will be of the format \\computer-name-from-step-13\dft6.For example, if the name of the server / other computer was dftcomputer then the path would be \\dftcomputer\dft6.
- Append the full path as determined in the previous step to the Target box. It should be something akin to:
"C:\Program Files\DFT6\dft8.exe" "\\dftcomputer\dft6" - Please note that the data path (\\dftcomputer\dft6) MUST be surrounded by double quotes if it contains a space. A path that does not contain a space can optionally be surrounded by double quotes.
- Select OK
Double click the DFT shortcut to run DFT using the data located on the server / other computer. Duty & Flight Times will now not prompt for a registration code. Repeat steps 1-7 above for any other computers that require installation of Duty & Flight Times.
How do I backup all pilot data onto a CD/USB stick?
To make a complete backup of all of your data files to a CD or USB stick you will require a blank CD or USB stick and Duty & Flight Times version 8.22 or above. Click here to order a Duty & Flight Times upgrade. It is highly recommended that users upgrade to 8.71.04 or above so that the registration code is also automatically backed up. This ensures that when data is restored a registration code will not be required from Aviation Software.
- Run DFT
- From the Pilot Summary screen, select File > Archive (also called Archive / Transfer Data)
- Select the Automatic Backup tab
- Select the Backup All button. This will create a complete backup of your data files - usually in the C:\Program Files\Dft6\PilotBackups folder
- In the Automatic Backup Folder text box select/highlight all of the text
- In the Automatic Backup Folder text box right-click and select Copy
- Start Windows Explorer (Select Start > Run > Enter explorer.exe > Select OK)
- In the Address text box right-click and select Pasteand then select Go
- This will list all of the backups for the past 3 months.
- You will need to find the backup you just created from DFT. The backup files are prefixed with the date the backup was created. For example, a backup created on the 3 Dec 2009 would be called 2009-12-03 DFT Pilot Data.zip. Therefore, you will need to find the backup dated with today's date.
- Right click on the xxxx-xx-xx DFT Pilot Data.zip file and select Copy
- Insert the blank CD or USB stick into the computer
- In Windows Explorer, find the USB stick drive or CD drive located under the My Computer icon. If you cannot see the My Computer icon on the left hand side pane select the Folders icon on the toolbar.
- Select the USB Stick drive letter or CD drive letter
- Select Edit > Paste from the menu bar at the top of Windows Explorer to copy the xxxx-xx-xx DFT Pilot Data.zip file to CD drive or USB stick
- If you have copied to a CD eject the CD and Windows will write the contents of the file to the CD and then eject the CD.
- You now have a backup copy of all of your pilot data and settings
How do I restore all pilot data from a CD/USB stick?
To resotre of all of your data files from a CD or USB stick you will require a backup of your data. Click here for further details on creating a CD / USB stick backup.
- Close DFT on all computers before restoring your data.
- Start Windows Explorer (Select Start > Run > Enter explorer.exe > Select OK)
- Find the USB stick drive or CD drive where the backup is located under the My Computer icon. If you cannot see the My Computer icon on the left hand side pane select the Folders icon on the toolbar.
- Select the USB Stick drive letter or CD drive letter
- The right hand side pane will list the backup files
- Right click on the backup file (it should be of the format xxxx-xx-xx DFT Pilot Data.zip - where xxxx-xx-xx is the date of the backup. i.e. 2009-12-03 DFT Pilot Data.zip) and select Explore
- A new Windows Explorer window will open
- Select Edit > Select All
- Select Edit > Copy
- Navigate to the location where DFT has been installed (typically, it is located in the C:\Program Files\Dft6 folder), specifically:
- Start Windows Explorer (Select Start > Run > Enter explorer.exe > Select OK)
- Select My Computer
- Select Local Disk C:
- Select Program Files
- Right click the Dft6 folder (it may also be called DFT8) and select Paste
- This will copy the backup files to the DFT installation
- Run DFT. DFT may prompt you for a registration code - in which case, please contact Aviation Software.
How do I setup DFT to automatically backup to the server, another computer or a USB stick?
- Run Duty & Flight Times
- From the Pilot Summary screen, select File > Archive (also called Archive / Transfer Data)
- Select the Automatic Backup tab
- Select the ... button next to the Automatic Backup Folder text box
- This will allow you to select the folder that the automatic backup is created to.
- To automatically backup to a USB stick
- Expand My Computer
- Select the USB stick drive
- Select OK
- To automatically backup to a server / other computer
- Expand My Network Locations
- Expand Microsoft Windows Network
- Select the computer name and the folder where backups are to be created
- Select OK
- Now whenever Duty & Flight Times closes it will backup to the location. An error will be displayed if the USB stick is not inserted or the server / other computer is unavailable.
I have transferred to another company - how do I take my data with me?
You will need a blank CD or USB stick to proceed and will require copying the data onto a portable medium (USB/CD) at your old employer and then restoring the data at your new employer. Specifically, please refer toHow do I transfer my data onto another computer using a USB stick? for further information.
How do I transfer my data onto another computer using a USB stick?
On the source computer:
- Run DFT
- From the Pilot Summary screen, select File > Archive (also called Archive / Transfer Data)
- Select the Backup / Copy To tab
- Select the ... button next to the Copy To list box
- Expand My Computer
- Select the USB stick drive
- Select OK
- Tick the Only copy selected pilots/crew members option
- Select the pilots to copy
- Select Run
On the destination computer:
- Run DFT
- If the registration screen is displayed:
- Select Evaluate
- Select Cancel to creating a new pilot
- Select OK to the evaluation message
- From the Pilot Summary screen, select File > Archive (also called Archive / Transfer Data)
- Select the Restore / Copy From tab
- Select the ... button next to the Copy To list box
- Expand My Computer
- Select the USB stick drive
- Select OK
- Tick the Only copy selected pilots/crew members option
- Select the pilots to copy
- Select Run
- This will copy the data files from the USB stick onto another computer.
How do I transfer my data onto another computer via email?
Duty & Flight Times provides an emailing module - that allows you to send your DFT files quickly and easily via email. Simply open the pilot to email. Then select File > Email Times, select the destination email address and Run. At the receiving end the email and the attachment which contains your flight data can be opened and it is automatically imported into the Duty & Flight Times database - again quickly and easily! Alternatively, use the following steps to transfer your data files manually:
On the source computer:
- Navigate to the Windows Desktop
- Right-click on the desktop and select New > Folder
- Rename New Folder to DataToEmail
- Run DFT
- From the Pilot Summary screen, select File > Archive (also called Archive / Transfer Data)
- Select the Backup / Copy To tab
- Select the ... button next to the Copy To list box
- Expand Desktop
- Select DataToEmail folder (that was created in step 2)
- Select OK
- Tick the Only copy selected pilots/crew members option
- Select the pilots to copy
- Select Run
- Run your email client (Microsoft Outlook, Microsoft Outlook Express, Thunderbird)
- Create a new email
- Select Insert > File Attachment (or equivalent)
- Select Desktop
- Open the DataToEmail folder
- Select all of the files in the folder and select Attach
- Send the email
On the destination computer:
- Navigate to the Windows Desktop
- Right-click on the desktop and select New > Folder
- Rename New Folder to DataToEmail
- Open the received email
- Select File > Save Attachments
- Save the attachments to the DataToEmail folder (under the Desktop)
- Run DFT
- From the Pilot Summary screen, select File > Archive (also called Archive / Transfer Data)
- Select the Restore / Copy From tab
- Select the ... button next to the Copy To list box
- Expand Desktop
- Select the DataToEmail folder
- Select OK
- Tick the Only copy selected pilots/crew members option
- Select the pilots to copy
- Select Run
- This will copy the data files from the email that you received onto another computer.
How do I transfer my data onto my laptop?
Users are licenced to install Duty & Flight Times on a laptop computer for each licenced pilot. This applies to users of Duty & Flight Times version 8.72 and above. For users of version 8.70.00 to 8.71.04, please contact Aviation Software for a discounted upgrade. For all other users, you must upgrade to the latest version of Duty & Flight Times to be licenced for installing Duty & Flight Times on a laptop computer. Click here to upgrade to the latest version of Duty & Flight Times.
For Duty & Flight Times 8.72+ users:
- Install DFT on the laptop computer. Please refer to How do I install Duty and Flight Times on my computer?
- Follow the steps How do I transfer my data onto another computer using a USB stick?. When starting DFT you will be prompted with the registration code screen. Click Evaluate, and continue with the steps listed in How do I transfer my data onto another computer using a USB stick?
- Once the data has been copied onto your laptop - the registration screen will no longer be displayed, and DFT will run in restricted mode - which means that DFT will only allow 1 pilot to be installed and run on the laptop computer. If additional pilots are installed copied or transferred to the laptop - DFT will not run in restricted mode and you will be prompted for a registration key.
Why do I receive a 'Pilot not found' message when opening a DFT email attachment?
Typically, this indicates that the email attachment has been modified by an anti-virus filter and therefore the pilot data is no longer in the attachment. Also, the size of the attachment is un-usually small (around 150 bytes). To correct the issue, try the following:
- Disable Anti-Virus software on the sending computer, restart the computer and then send an email. If the email is successfully sent with Anti-Virus disabled then further consult your Anti-Virus software vendor for details on correcting this issue.
- Contact your Internet Service Provider to determine whether email attachments with a DFTP file extension are modified by their email filter.
- Or, if none of the above work, then you can manually send the files using your normal email client (Outlook / Thunderbird) seeemailing data manually.
My computer has been cleaned of a virus or spyware and now DFT is asking for a registration code
Unfortunately, some programs will remove important data files located in the C:\Program Files\Dft6 or C:\Program Files\Dft8 folders (typical folders where Duty & Flight Times is installed). These files contain flight data, pilot settings and the registration code. So although Duty & Flight Times is prompting for a registration code, it is most likely that your flight data is also missing! Although Aviation Software can provide a registration code - you will still be missing your pilot data. If you have had your computer cleaned by a 3rd party you will need to request that the data files located in the C:\Program Files\Dft6 or C:\Program Files\Dft8 folders (depending on where you installed Duty & Flight Times) be restored. Specifically, the *.dat and *.60? files need to be restored to exactly how there were before the computer was cleaned.
How do I change where the DFT package importer the files to?
If you are running a version prior to Duty & Flight Times 8.72.05:
- Copy the DFTPackageImport program from the Duty & Flight Times installation folder to the location of the data files (for example
\\server\dftdata)- Start Windows Explorer (Select Start > Run > Enter explorer.exe > Select OK)
- Expand My Computer
- Navigate to C:\Program Files\Dft6 (or the location where DFT is installed)
- Find and select the DFTPackageImport program
- Select Edit > Copy
- Navigate to the location where the Duty & Flight Times data is to be imported to (for example, \\server\dftdata)
- Select Edit > Paste to copy the DFTPackageImport program to where the data resides (for example, \\server\dftdata)
- Change the DFTP file type to run the copied DFTPackageImport program
- Right-click on one of the Duty & Flight Times files (.60D) in the installation folder
- Select Open With > Choose Default program
- Select Browse
- Navigate to the location where DFTPackageImport.exe resides as per step 1 above. (for example \\server\dftdata\DFTPackageImport.exe) and select the DFTPackageImport.exe program.
If you are running version of Duty & Flight Times 8.72.05 or after you can either follow the above steps or you can specify as a second command line argument for the DFTP file type the location where the files should be imported to. This provides a more flexible and simpler solution.
- Start Windows Explorer (Select Start > Run > Enter explorer.exe > Select OK)
- Select Tools > Folder Options
- Select File Types
- Scroll down to extension DFTP and select the item
- Select Advanced (Click Restore if you cannot see theAdvanced option)
- Select the Open action
- Select Edit
- Modify Action used to perform action path to specify the full path to where the data should be imported to. For example, typically the field will be something akin to "C:\Program Files\Dft6\DFTPackageImport.exe" "%1". Then the path should be changed to something like "C:\Program Files\Dft6\DFTPackageImport.exe" "%1" "\\server\dftdata", where \\server\dftdata is the destination location where the data should be copied to.
After making the above changes, to test the program double click on a DFTP email attachment to ensure that the package imports as expected. For further information on emailing data see How do I transfer my data onto another computer via email?
The registration code that I received does not work?
The registration code received with your Duty & Flight Times letter will expire usually after 14 days of ordering Duty & Flight Times. Therefore, you need to install Duty & Flight Times within 14 days. Otherwise, please contact Aviation Software for a new registration code. Aviation Software may charge an additional fee for supplying a new registration code.
Why are the dates shown in American format?
- Select Start > Control Panel > Regional and Language Options
- In the Regional Options tab, ensure that English (Australian) is selected, not English (United States)
- Restart Duty and Flight Times
I am running Windows 7 and all dates are in the correct format (Australian) except for the work date which is in American format?
- Select Start > Control Panel > Clock, Language and Region > Change the date, time or number format
- Select English (United States)
- Select Apply
- Select English (Australian)
- Select Apply
- Restart Duty and Flight Times
I get an error 'Report width is larger than the paper width' when printing a report?
For Windows:
- Select Start > Printers and Faxes
- Select the default printer (the default printer is indicated by a tick next to the printer icon)
- Select File > Printing Preferences
- Select Advanced
- Change the Paper Size to A4
- Select OK
- Select OK
- > System Settings > Printers & Scanners > Default Printer
- Default paper size > A4
How do I export my data?
- Go to Pilot Summary, then click File > Export Data.
- Select the date range.
- Select Export.
- Open the export folder when prompted and select all of the exported data.
- From Windows Explorer select Edit > Copy and then on your local computer select Edit > Paste to copy the files from the server onto your local computer.
When I send an email I receive error: Apply for IPv6 Policy?
I get an error when using GMAIL and sending a DFT email
If you are running DFT version 10.1.7+ then ensure that you have set Email Server to smtp.gmail.com. Ensure Use Email Server Authentication is checked.User Name is set to your email account (i.e. you@gmail.com) and Password is set to your GMAIL account's password. Ensure Use SSL is checked and SSL Port is set to 587. You must also ensure that "Allow less secure apps" is ON in your account settings. Specifically, go to My Account > Sign-in & Security > Connected apps & sites > Allow less secure apps: ON.
Older versions of DFT do not support using GMAIL or other email servers that require a secure connection to the email server (via TLS or SSL). It is recommended that you use the email server that is provided by your Internet Service Provider (ISP), as these do no generally require a secure connection to the email server. Please contact your network administrator about obtaining details of your Internet Service Provider's email server.
Can I install and run DFT on a Macintosh computer?
Yes, Duty & Flight Times can be run on a Macintosh computer that is utilising a virtual machine such as VMWare Fusion. VMWare Fusion allows you to run Microsoft Windows based software (such as Duty & Flight Times) on an Intel based Macintosh computer. It retails for approximately $120 AUS. It will also require the installation of Windows XP/Vista/7. For more information, please click here.
How do I obtain the company name and serial number of my DFT installation?
Aviation Software may request that you provide the company name and serial number that Duty & Flight Times is registered to. To do so:
- Run DFT
- Select Help > About Duty and Flight Times
- Note the company name and serial number in the bottom-right corner of the screen
Why does the Automatic Backup facility report - NOTHING TO DO!
Duty & Flight Times versions prior to 8.71.04 will not backup to a location outside of the C:\Program Files\Dft6 folder. Solutions are:
- Upgrade to the latest version of DFT. Click here to order an upgrade.
- Setup DFT to backup to the default folder - C:\Program Files\Dft6\PilotBackups
- Use a 3rd party backup tool that backs up all of the files in the installation folder (typically C:\Program Files\Dft6) using the following criteria:
- *.60?
- *.dat
When I run DFT I get a runtime error 429 - what is wrong?
Please note that even if you are attempting to run Duty & Flight Times from a server - you will still need to install Duty & Flight Times on each computer locally. After installing Duty & Flight Times locally (and verifying that it runs correctly) you will then need to apply the steps detailed in How do I setup a local computer to use the DFT data located on the server / another computer?
How do I setup DFT to always open a particular pilot?
In order to setup to always open a particular pilot file, and bypass the Pilot Summary screen:
- If you have not already done so, install DFT on the machine using the installation CD
- After installation, navigate to the desktop
- Right click the DFT shortcut and select Copy
- Right click on the desktop and select Paste
- Right click the copied DFT shortcut and select Properties
- In the Target box (typically containing something like "C:\Program Files\DFT6\dft8.exe" you will need to specify the full path to where the pilot's data is located.
- The format of path to the other computer will be of the format C:\Program Files\Dft6\PilotName. For example, if the pilot name was John Smith and the file is located in C:\Program Files\Dft6 then the path would be "C:\Program Files\Dft6\John Smith" (including quotes)
- Append the full path as determined in the previous step to the Target box. It should be something akin to:
"C:\Program Files\DFT6\dft8.exe" "C:\Program Files\Dft6\John Smith" - Select OK
- Double click the shortcut to open the pilot directly in DFT
How does the DFT licencing work?
- For version 8.64 and prior:
- The licencing structure is based upon the maximum number of people that can simultaneously run Duty & Flight Times. For example, if 2 users are already runningDuty & Flight Times and an additional user also attempts to run Duty & Flight Times an error message will be displayed indicating that the maximum number of users loggged in has been exceeded (assuming you are licenced for 2 users).
- For version 8.70 and above:
- The licencing structure is based on the maximum number of pilots that can be created or imported into Duty & Flight Times. Duty & Flight Times limits the creation of a new pilot that would exceed the maximum number of licenced pilots. Contact Aviation Software or click here to order an additional pilot licence(s).
- There is no restriction on the number of computers that Duty & Flight Times may be installed on.
- Furthermore, users are licenced to install Duty & Flight Times on a laptop computer - which may be used to run 1 pilot. For further information on setting up a laptop computer, refer to How do I transfer my data onto my laptop?
When I import an emailed package I receive an error "429, "ActiveX Can't Create Object".?
How do I delete a pilot?
- Start Duty and Flight Times
- From the Pilot Summary screen, select the pilot to delete
- Select File > Delete
If after re-starting Duty and Flight Times the pilot is not deleted, then you do not have permissions to delete the file. In version version 8.76 and prior an error message is not shown when attempting to delete the pilot. In subsequent versions an error message will be displayed if the appropriate delete permissions do not exist. Please contact your IT adminstrator and ensure that you have full permissions (in particular delete permission) to the directory and all pilot files. Typically, files are stored in C:\Program Files\Dft6 or C:\Program Files\Dft8. Files may also be stored on a server, in which case the DFT shortcut will indicate the directory as the command line argument.
I receive an error Access Denied when running Airstrips for the first time
- Specify a location where the database can be created:
- Run Windows Explorer
- Navigate to the Desktop
- Select File > New > Shortcut
- Select Browse...
- Navigate to the folder where Airstrips was installed (typically C:\Program Files\Airstrips) and select the Airstrips.exe application.
- Select OK to close the file selection window
- After the path to the Airstrips.exe (typically "C:\Program Files\Airstrips\Airstrips.exe") enter a space, followed by the directory where the database should reside (for example, "\\server\airstripsdata"). Ensure that the directory path is surrounded by double quotes.
- Select Next
- Enter the name for the shortcut (Airstrips)
- This shortcut will now use the database in the specified directory. If no database exists then one will be created, so ensure you have permissions to write to the directory.
- Provide Full Control to the installation folder for the account.
An "Invalid pilot name or password" error occurs when synchronising
- Connect to the online service:
- Start Duty and Flight Times.
- Select your name from the Pilot Summary screen.
- Select File > Change Password and change your password.
- From your iPhone / iPad, run the Settings app.
- Select DFT.
- Enter your pilot name as it is spelt in the online service (case insensitive).
- Enter your password exactly as it is entered in the online service (case sensitive).
I have followed the FAQ suggestions and am still having difficulties - do you offer technical support?
Yes, we do offer technical support for installation and configuration of Duty & Flight Times and any other difficulties you may experience. Please refer to the terms and conditions at the top of this page for further information on charges.